Prototype CONNECTIT double/single skinks' tank design for multibay .
Posted: Mon Jan 27, 2020 7:01 am
Ready to return to my modular mix and match multibay dragon and skink enclosure .
Built the frame for the first of two prototype bearded dragon enclosures using aluminium 1" square hollow tubes connected using CONNECTIT joiners , and 10x10x1.6mm aluminium channel to slide the precut 6mm thick UV stabilized clear acrylic side , back and front panels into.
The building the second enclosure , will be identical on Wednesday (?). See my other thread for design and how it'll all fit together and with my mobile cabinet base that it'll all sit ontop off ( design and build and "final" result after stain vanishing.
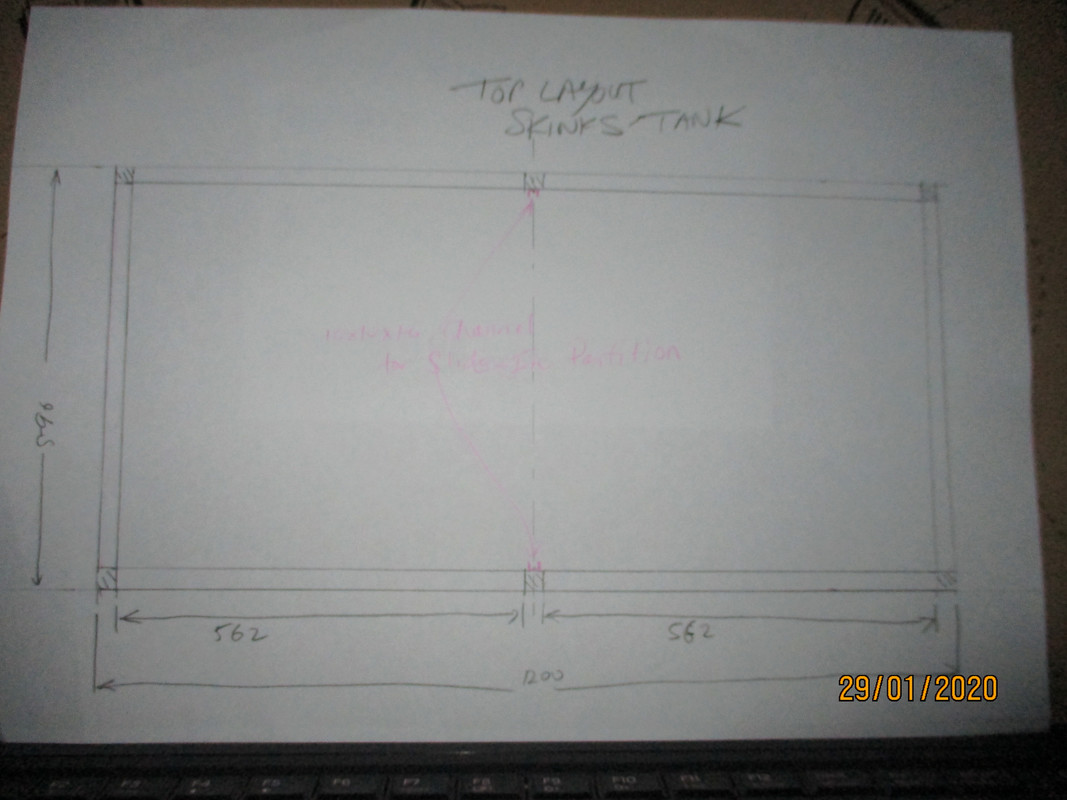
I'm opting for a 40cm tall tank for the 3 water skinks and it'll designed so I can very easily and quickly partition one side from the other by lifting off the 9mm thick plywood lid , and sliding a 6mm thick panel of white acrylic or maybe some 6mm thick panel of plywood to separate my 2 adult females from my horny subadult male when I don't them to breed . My design is shown below :
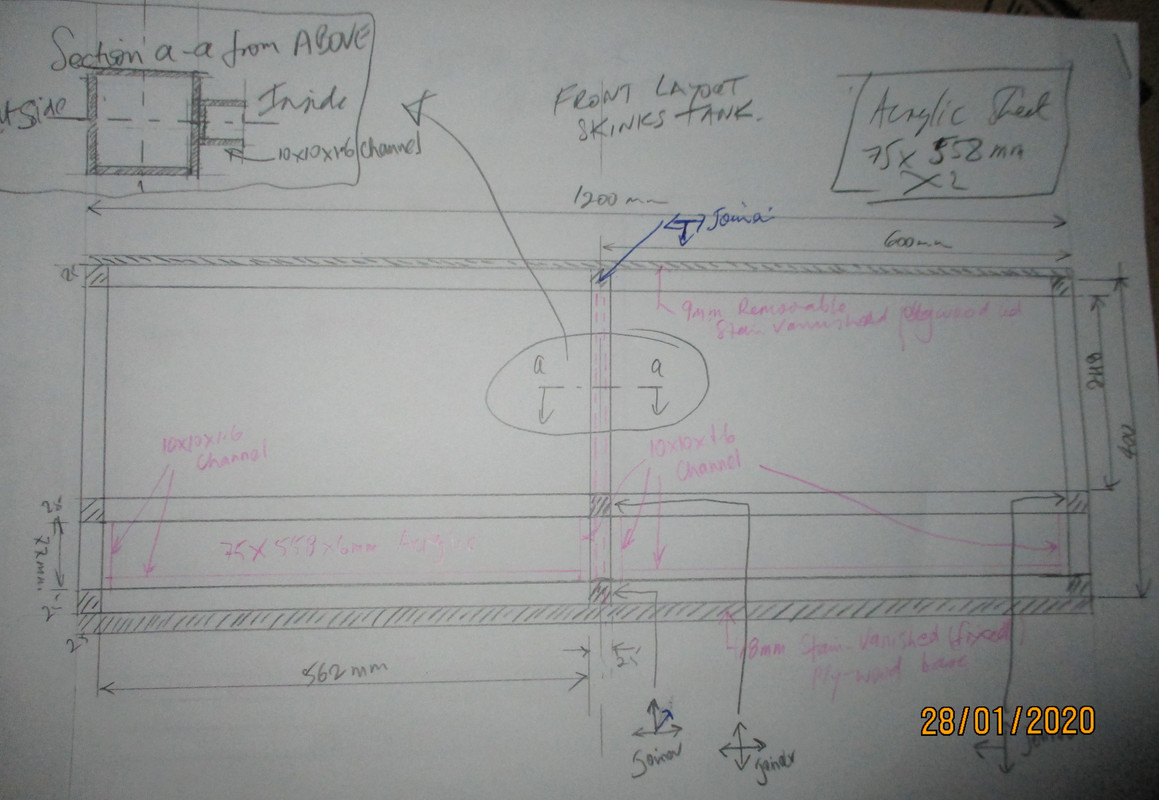
front
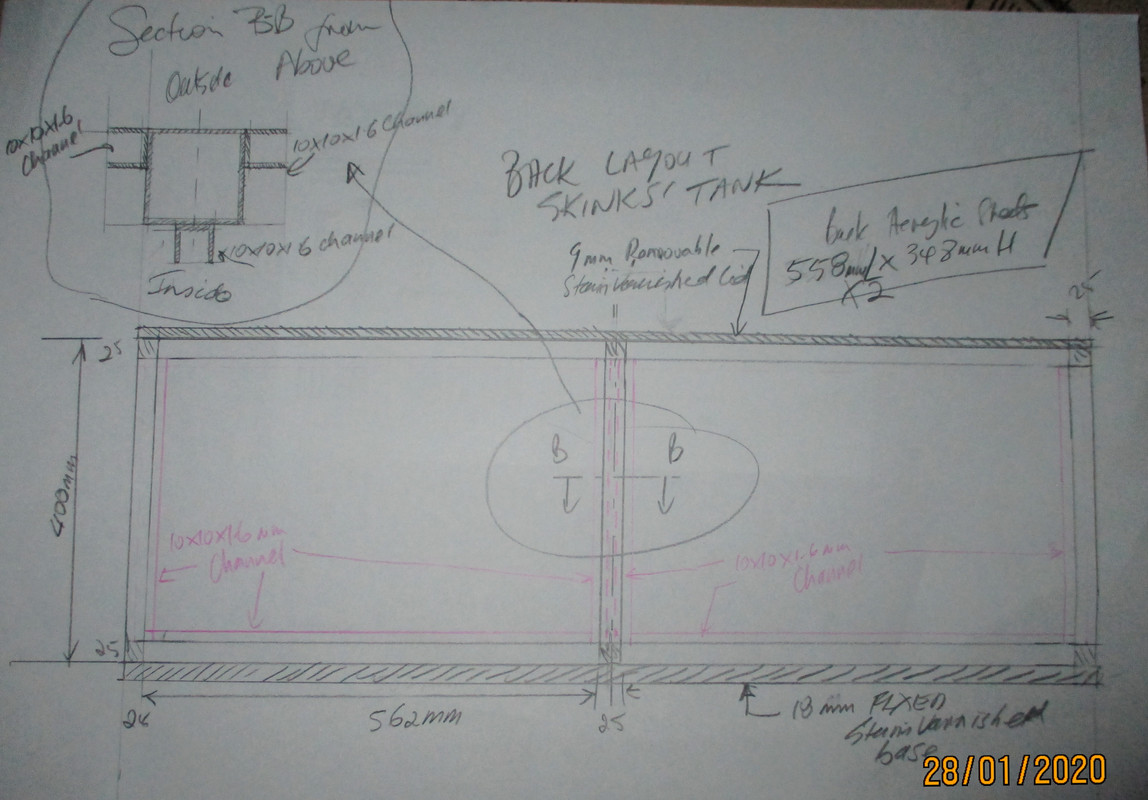
back
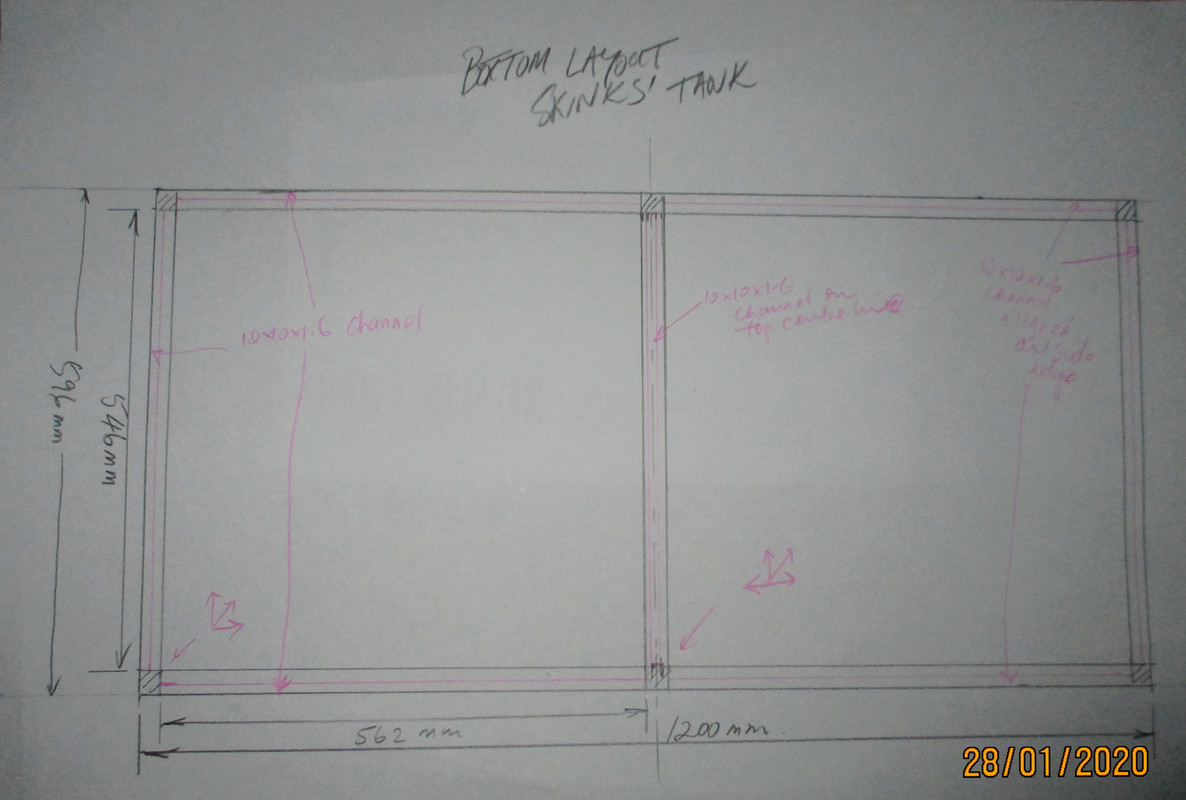
bottom
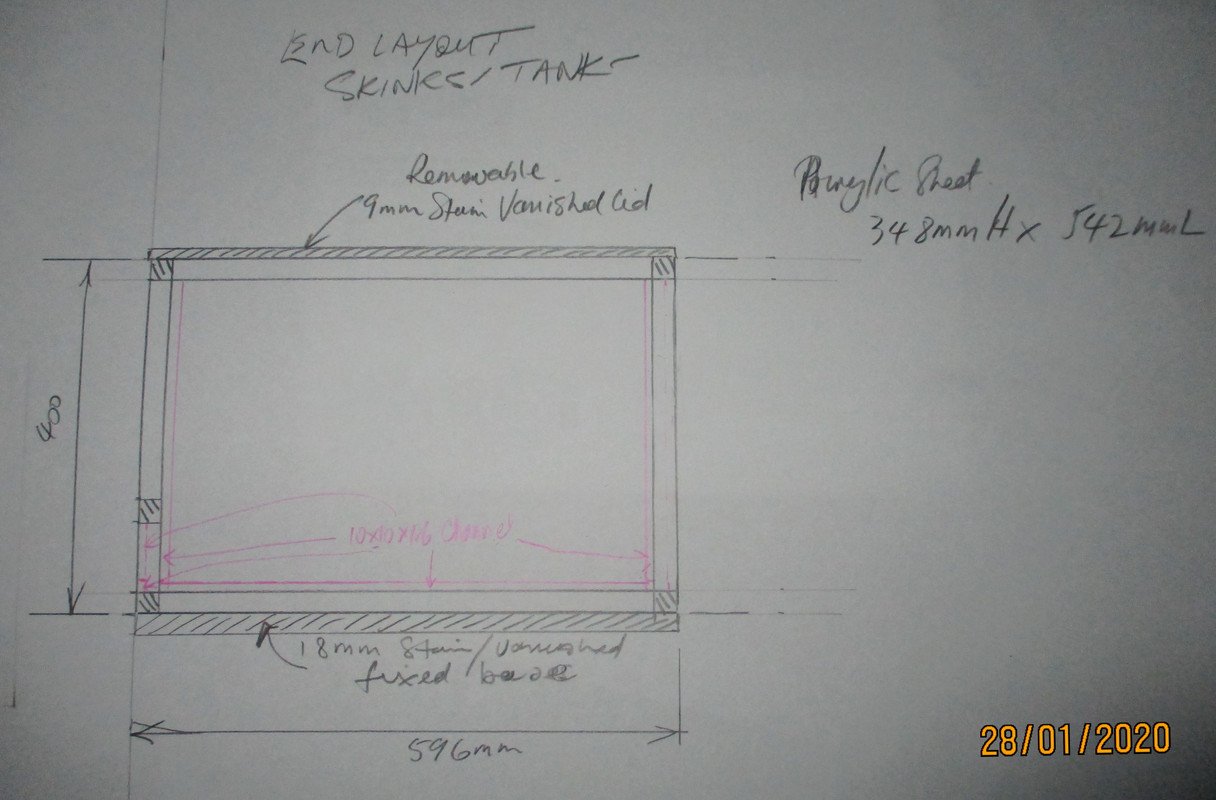
side
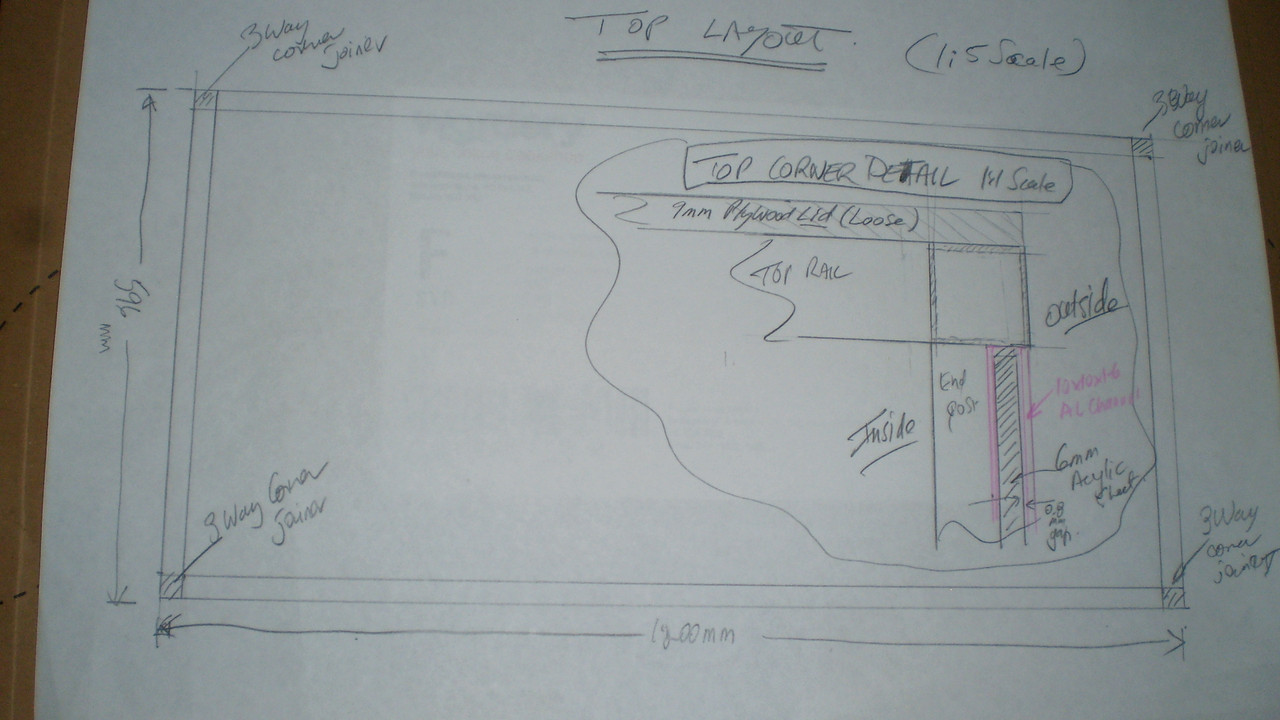
top (showing how channel fits the 6mm acrylic
top in general
The adjustable tank will is also good design for baby and juvenile BTS , PTS , knobtail skinks, etc being two side by side 600mm L x 596mm D x 400mm T tanks that can be converted a single 1200mm x 596mm D x 400mm T tank in about 1 minute.
I did consider doing something similar to that American company who sell similarly constructed tanks wrt using double sided adhesive tape to hold skinky under doors kickboard in place but I don't that's a satisfactory solution (even if it looks tidier, being invisible and not obvious).
I also considered going with a 30cm to 35cm tall tank , but think that's too restrictive on the climbing options and brings the basking light too close to the skinks.
Comments welcome.
Built the frame for the first of two prototype bearded dragon enclosures using aluminium 1" square hollow tubes connected using CONNECTIT joiners , and 10x10x1.6mm aluminium channel to slide the precut 6mm thick UV stabilized clear acrylic side , back and front panels into.
The building the second enclosure , will be identical on Wednesday (?). See my other thread for design and how it'll all fit together and with my mobile cabinet base that it'll all sit ontop off ( design and build and "final" result after stain vanishing.
I'm opting for a 40cm tall tank for the 3 water skinks and it'll designed so I can very easily and quickly partition one side from the other by lifting off the 9mm thick plywood lid , and sliding a 6mm thick panel of white acrylic or maybe some 6mm thick panel of plywood to separate my 2 adult females from my horny subadult male when I don't them to breed . My design is shown below :
front
back
bottom
side
top (showing how channel fits the 6mm acrylic
top in general
The adjustable tank will is also good design for baby and juvenile BTS , PTS , knobtail skinks, etc being two side by side 600mm L x 596mm D x 400mm T tanks that can be converted a single 1200mm x 596mm D x 400mm T tank in about 1 minute.
I did consider doing something similar to that American company who sell similarly constructed tanks wrt using double sided adhesive tape to hold skinky under doors kickboard in place but I don't that's a satisfactory solution (even if it looks tidier, being invisible and not obvious).
I also considered going with a 30cm to 35cm tall tank , but think that's too restrictive on the climbing options and brings the basking light too close to the skinks.
Comments welcome.